
Thrifting has, over the years, grown from a purely budget-friendly experience to becoming a new and fun challenge in creative expression. Yeah, you could buy that lampshade for your living room, but you know what would be more fun? You could turn it into a work of art worthy of Degas himself.
Yes, you guessed it. We’re going to talk about upcycling thrift store finds! More specifically, we’re going to show you four different ways you can upcycle a generic canvas print.
At AMLI, we love to talk about thrifting. We’ve talked about thrifting in Los Angeles and thrifting in Austin. We’ve explored how thrifting is a piece of the sustainable fashion movement. We’ve talked about how to furnish your apartment on a budget, and now we’re going to show you some great ways to upcycle your thrifty finds!
Let’s go!
What to look for when you want to do an upcycling project.
Upcycling is not a hard science. There’s an endless amount of ways you can customize a thrift store find, and not all of them will work out the way you want them to. Here are a few steps you can take so that you don’t feel utterly overwhelmed by the possibilities.
Pinterest is your friend!
The world is your oyster, and Pinterest, I suppose, is the metaphorical… pearl? I guess?
You get the picture. Pinterest is the place to go for any and all creative ideas and inspiration. Create a Pinterest board where you can store all the ideas that you like, then spend some time just delving deeper and deeper into the rabbit hole that is the Pinterest explore page.
Visit the thrift store
Thrift stores are like boxes of chocolate. You never know what you’re going to get.
Get used to the idea that you probably won’t find exactly what you’re looking for on the first, second, eighth or twentieth time you visit the store, and you might never find the specific thing at all! Do, however, spend some time digging through the piles of goodies and look out for anything that reminds you of any of the Pinterest projects you’ve saved. And keep an open mind! You may not have found the framed 19th century-esque portrait you were looking for, but there may be a few printed canvases that could do the trick, too!
Have confidence in your creativity! Be bold, and don’t be afraid to just try it. After all, you could always donate it back again.
Make a list of supplies
Once you’ve got your thrift store item and an idea brewing in your head, make sure you have all the supplies you need to finish the project. There’s nothing more demoralizing than getting really into a project and then realizing that you don’t have what you need to finish it. That can lead to a pile of unfinished projects on your living room table, and no one wants that.
Have fun!
The only rule when it comes to upcycling thrift store finds is that there are no rules! Feel free to make the project your own and be as creative with it as you want. Go crazy, try new things, and have fun!
Four ways to upcycle thrift store wall art
I found this set of four printed photo canvases at Goodwill for about $5 and have been wanting to try out a few different techniques for upcycling them and making them my own. I only used supplies I had at home, and doing all four of them took under three hours.
Minimalist stripes
Supplies: masking tape, scissors, white acrylic paint, medium paintbrush
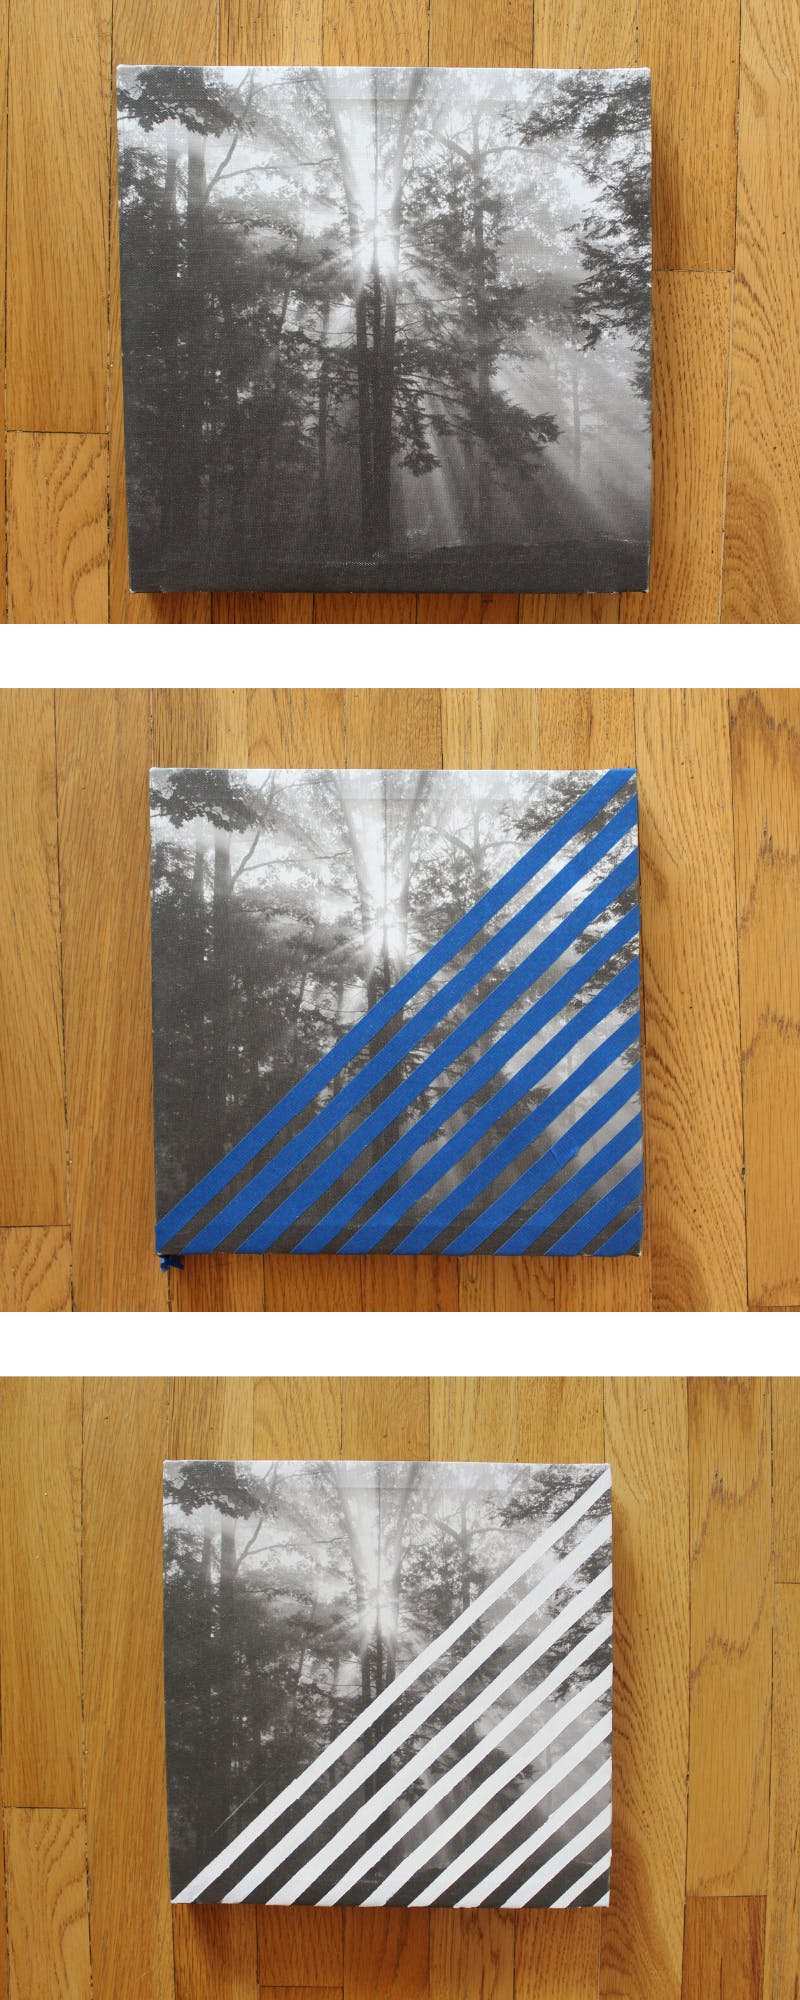
I used the masking tape to create clean, sharp lines that made for a very modern and classy look!
I cut a strip of masking tape that was as long as the diagonal of the canvas, then I cut that strip in two lengthwise because I wanted thinner lines. I placed my first strip across the widest edge of the canvas so that I could use it as a reference. I placed the second strip one strip's width away from that one, then continued until I had covered all the area I wanted to cover.
Making sure to smooth down all the strips so they were flush against the canvas, I painted over the exposed portions between the strips. Once the paint was dry, I removed the strips. Voila!
You can obviously play around with the width, pattern and placement of the strips on your own project, but this is a quick and easy way to get clean, sharp lines that would look great as a set of paintings together.
Kids’ monsters
Supplies: pencil, white acrylic paint, colored acrylic paint, black fine-tipped marker, thin paintbrush

If you’re going for a subtle kids’ vibe while still keeping your artwork classy, then try adding a few fun elements to your grown-up-looking artwork!
I drew the outlines of some fun monsters onto the canvas before filling in the shapes with white paint. The white paint allows the colors you paint over it to stand out more, so while it’s not particularly necessary, it does help a lot.
Once the white paint had dried, I painted over the shapes with color before outlining everything with a black border. I added a few smaller details in, like the eyes and eyebrows, with a fine-tipped black marker.
Cartoon outlines
Supplies: thin paintbrush, acrylic paint

Adding a few outlines to a picture can give it an animated, cartoonish feel. The messy lines and haphazard leaves I painted onto this picture give the canvas a mixed-media-esque feel to it, which I found to be quite stylish.
You can be as delicate or rough as you like with this technique. I picked out a few trees and trunks in the foreground that I wanted to use, then I took a thin paintbrush and loosely outlined the biggest shapes I could find, leaving a little overlap for style.
In this case, less is more, as you don’t want to fill the whole canvas with outlines. I’d suggest picking either the foreground or background to work with so that the picture maintains its depth.
Quote wall art
Supplies: pencil, thin paintbrush, acrylic paint
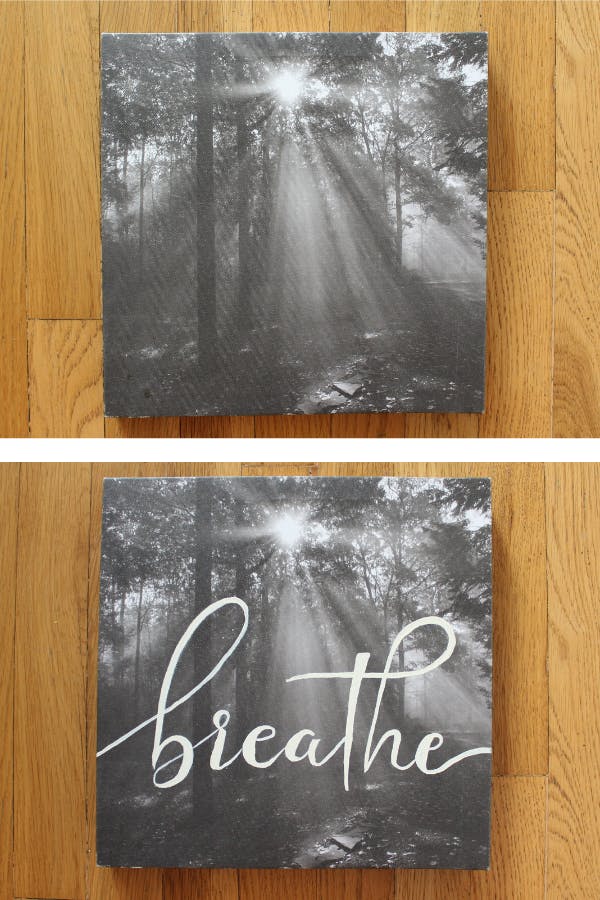
Live. Love. Laugh. You’ve seen these overpriced generic wall quotes sold all over the place, so why not make your own?
Using a picture on Pinterest for reference, I sketched the lettering onto the canvas using a white pencil (so that it would show up on the dark picture). Using a thin paintbrush and slightly watered-down paint, I filled in the lettering until I was satisfied with the thickness and smoothness of the letters. Easy peasey!
So, those were four ways to upcycle thrift store wall art that can be easily done at home! No matter how talented you think you are or aren't, you should never stop anything from getting in your way of fun and creativity! With a little help from Pinterest and your friendly neighborhood AMLI blog (hello!), you can conquer any upcycling project heading your way!
Enjoy!
Pin it!
All photos courtesy Colleen Ford

Colleen Ford is a South African who now lives on Oahu in Hawai'i. She loves to travel, camp, spearfish and hike. She's also part of a super cool canoe club and is pretty decent at it. Colleen enjoys Star Wars and also not being cold ever.